Release Notes - Jan 22, 2026
Release Notes 01-22-26
The following changes will be released on January 22, 2026 at 9:30PM EST.
Fixes
Resolved an issue where the A/B testing checkbox appeared before being available during campaign creation. The option will now only appear once a client is selected.
Enhancements
Added the ability to export a contact list template directly from contact list details
Improved validation when editing contact lists by alerting users if a list name is not unique
Updated click rate reporting to exclude clicks generated from test messages for more accurate performance metrics
A/B Testing Quick Guide
AB Test Guide
A/B test type campaign allows you to set up two message variations that you can send out to a test audience and then select the winning version to send out to the remainder of the selected audience.
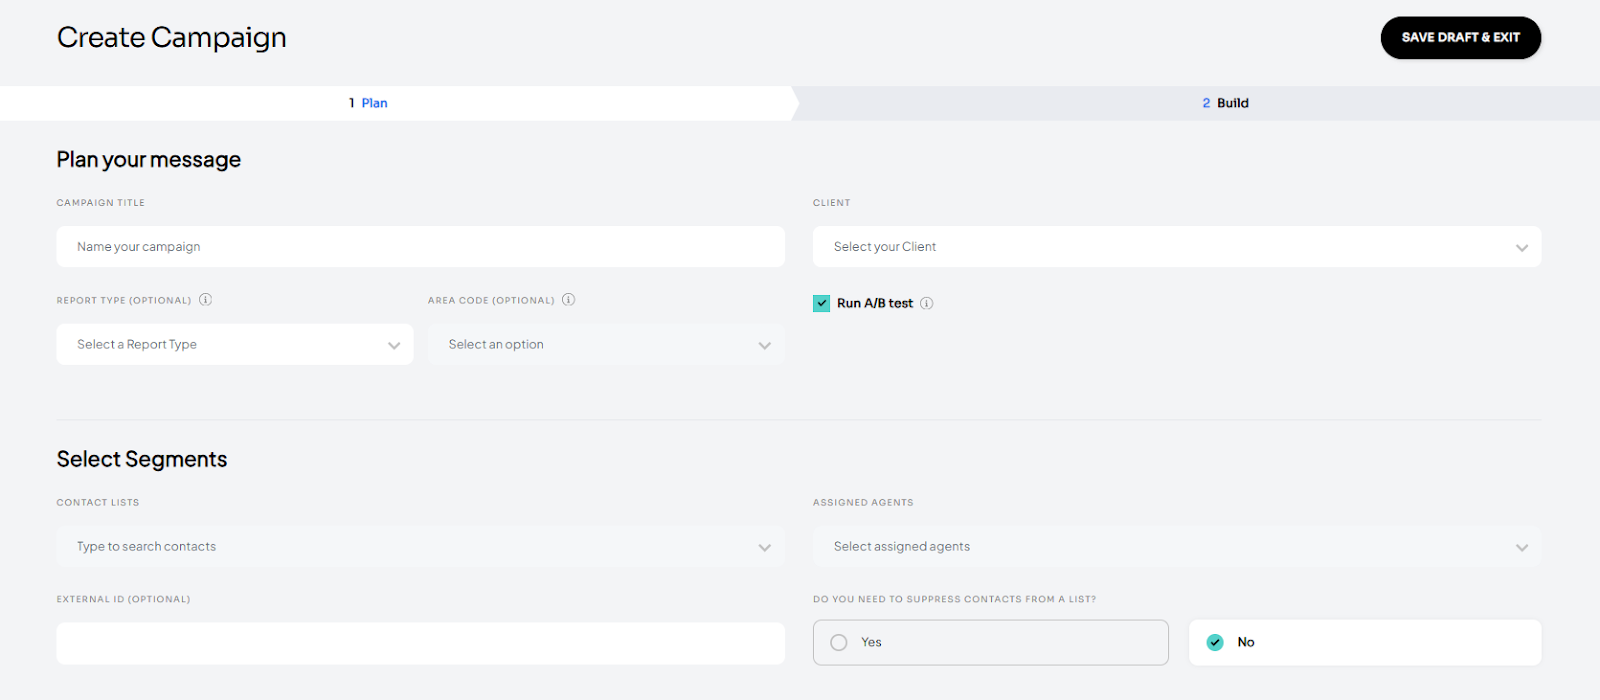
Setting up and running an A/B test campaign
Navigate to the Campaigns page.
Click on the ‘Create Campaign’ button.
On the plan page, check the ‘A/B test’ checkbox and fill out the remaining fields.
Click on the ‘Next’ button.
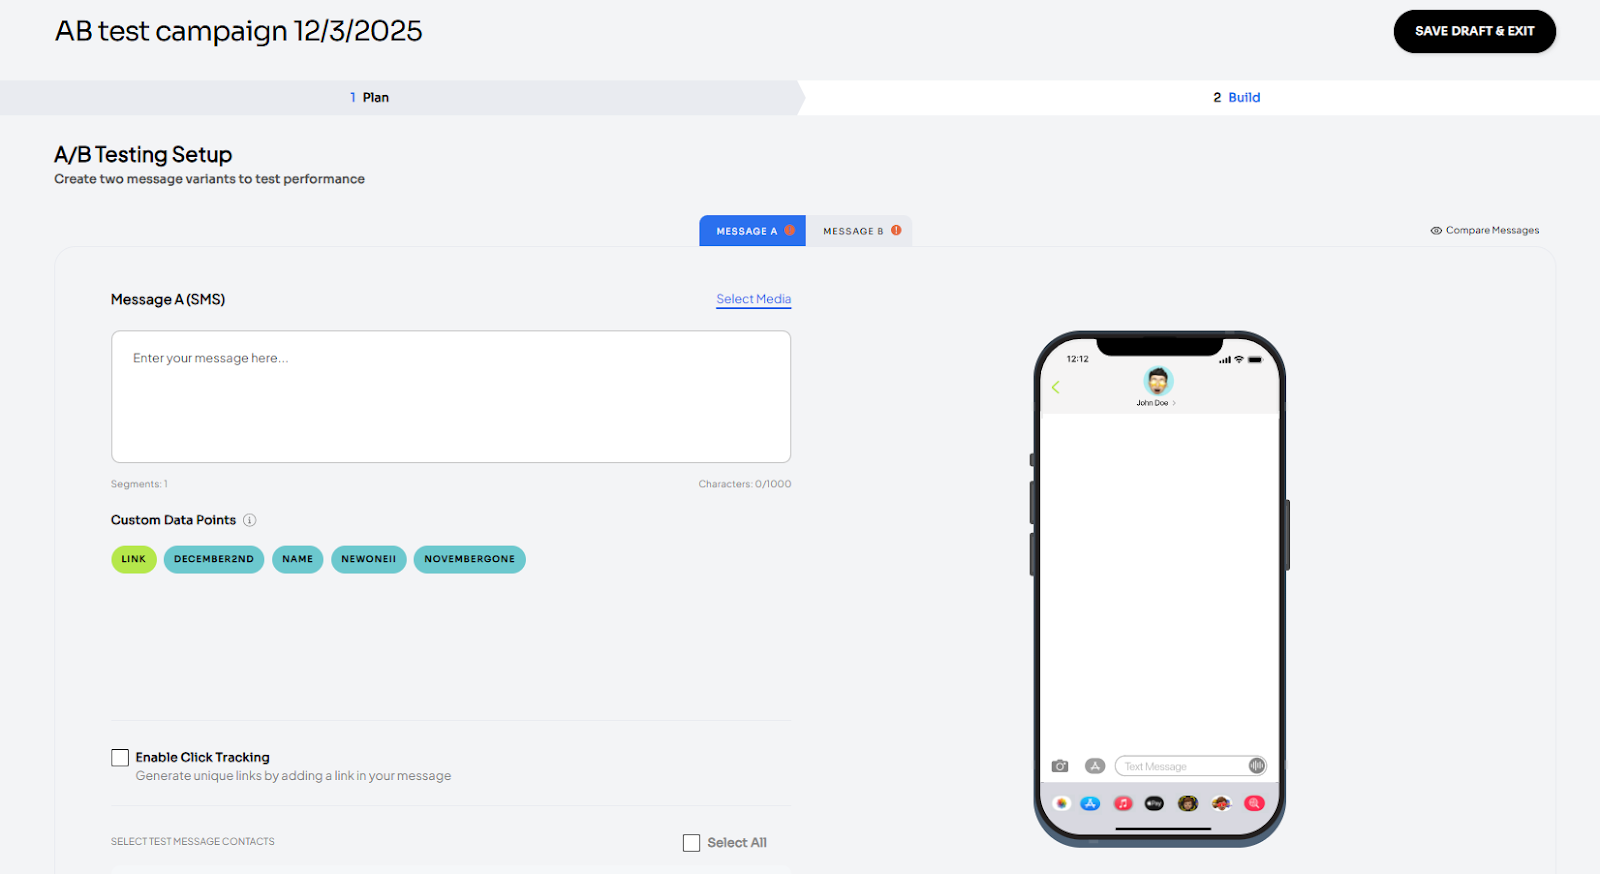
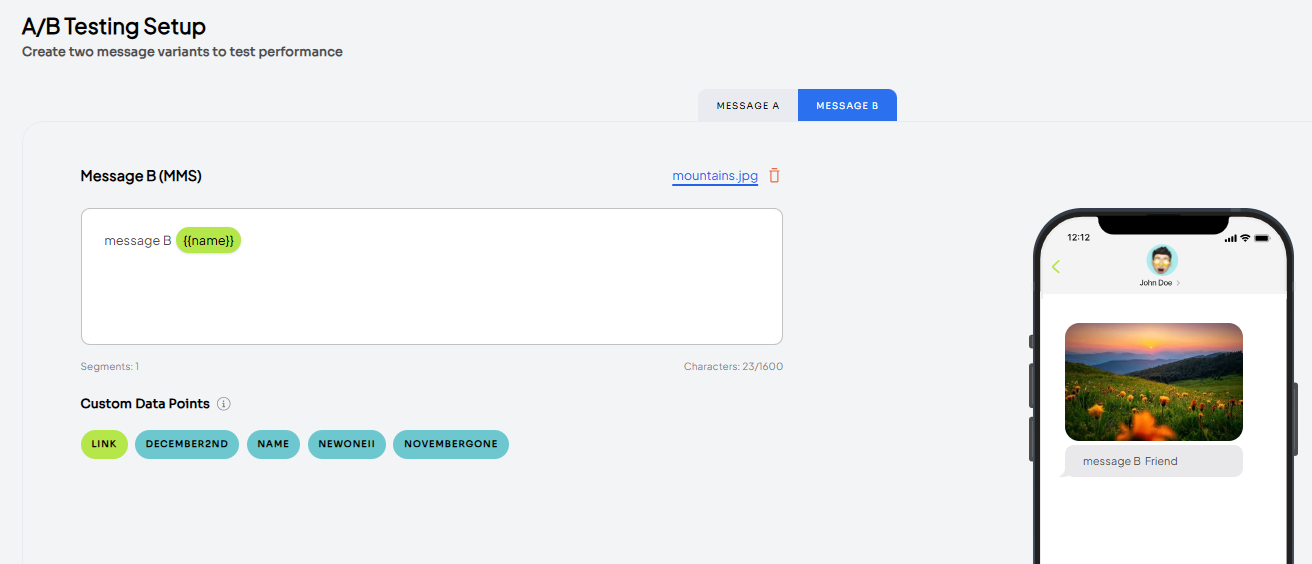
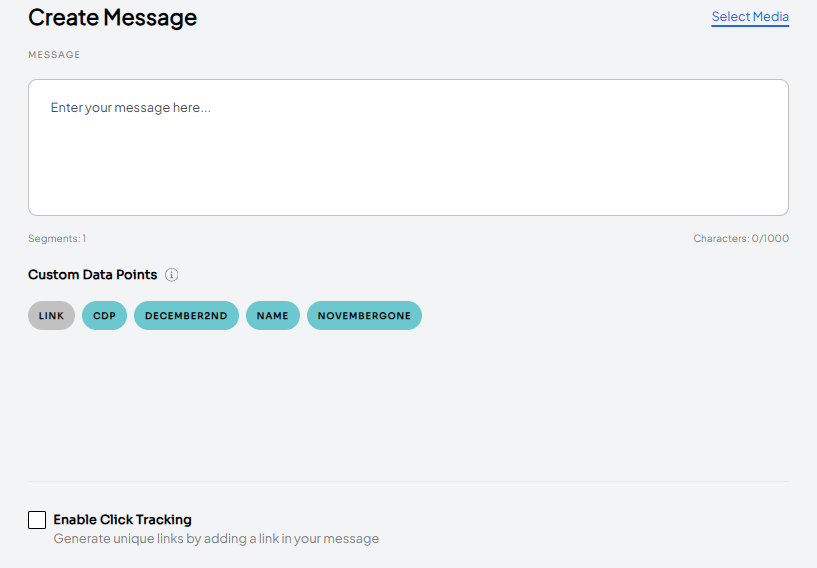
On the build page, fill out the two variations of the campaign message you want to send out.
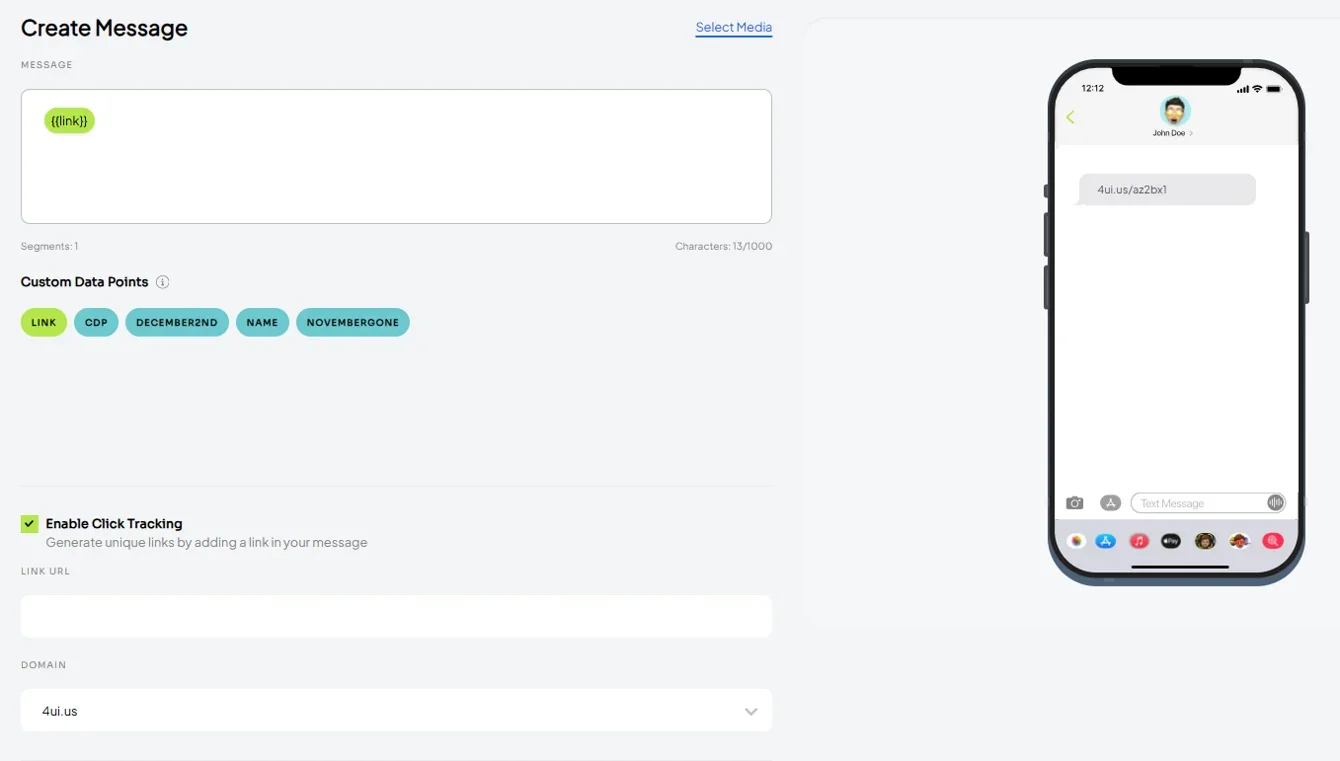
To set up an SMS message, simply add in your message.
To set up an MMS, click on ‘Select Media’ and upload the file and the system will automatically convert it to an MMS message
To include links in your message, select the ‘link’ custom data point and check the ‘Enable click tracking’ checkbox. Follow the remainder of steps and review the phone preview to ensure the correct short link was selected.
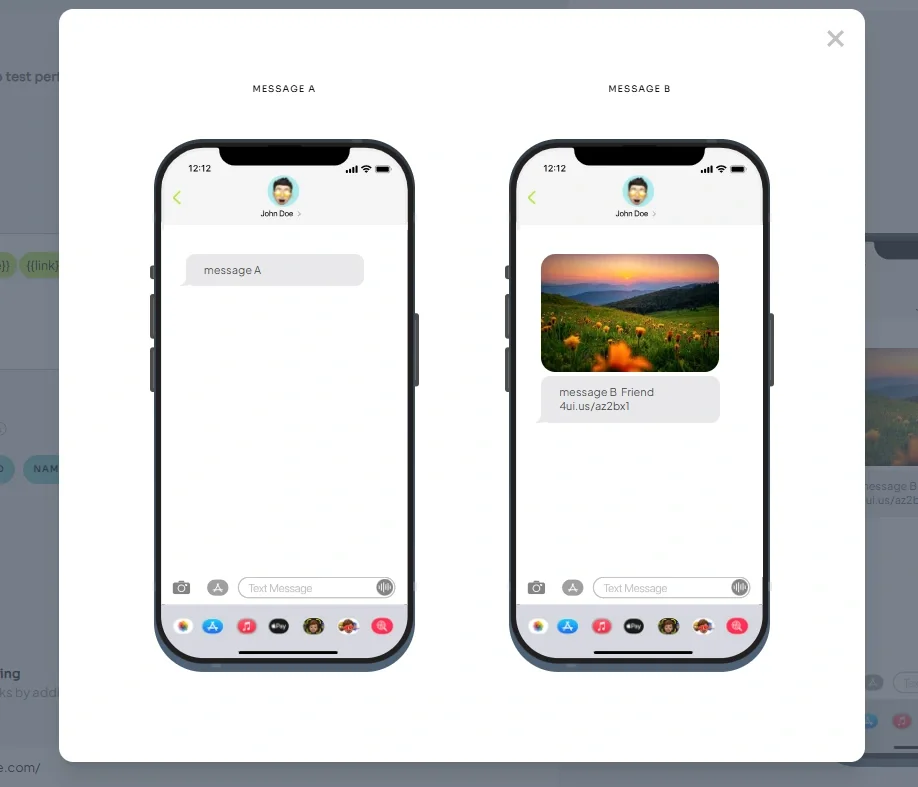
To view the message variations side by side, click on the ‘Compare messages’ icon in the upper right corner.
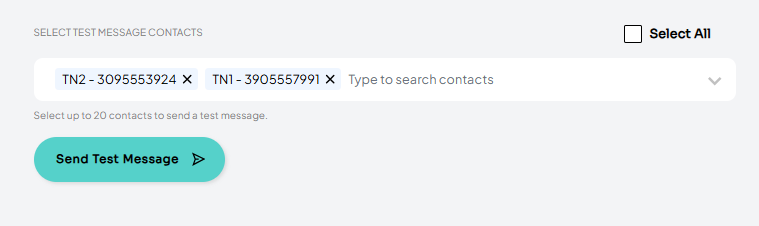
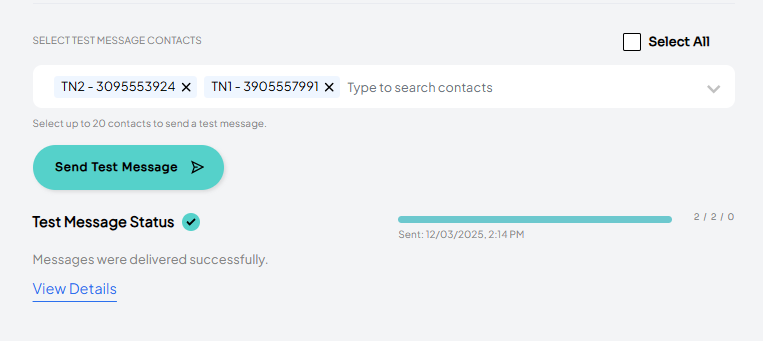
Before running the A/B test, you can send out preview or internal test messages to any test contacts available for the client. Simply select from the available numbers and click the ‘Send Test Message’ button. Please note: the test message will be sent out for whichever message version you are currently on (A or B).
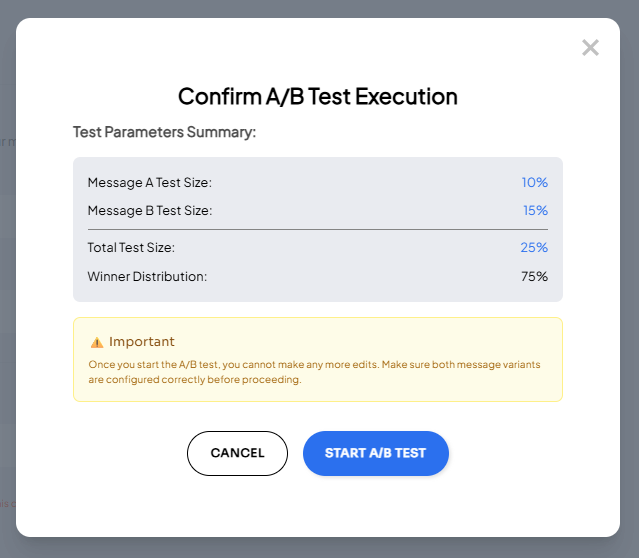
Once you are ready to run the AB test, enter the percentages you want each variation to be sent to and click the ‘Run a/b test’ button. Please note: you need to have a value greater than 0 in each message group size field. And the total percentage can’t exceed 40% of the selected contacts. You will need to adjust the percentages in order to proceed.
Review the percentage breakdown and confirm that you are ready to run the a/b test. Please note: once the A/B test begins, you will no longer be able to make any edits to the campaign.
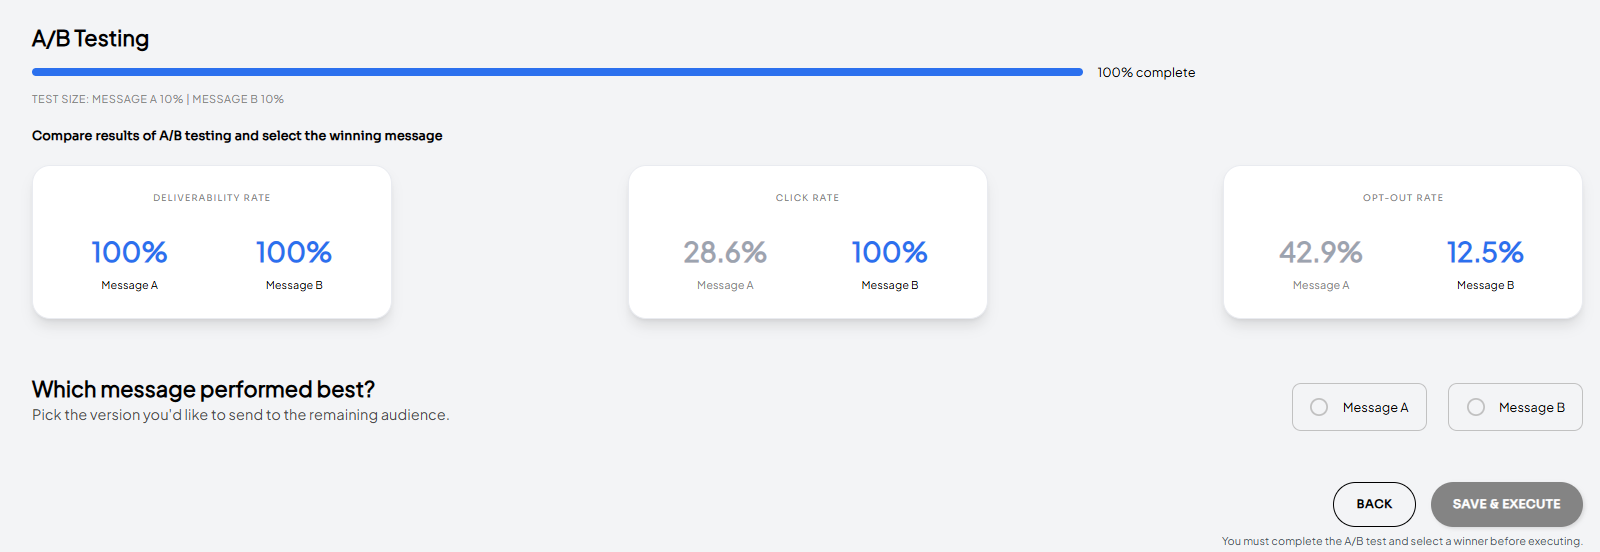
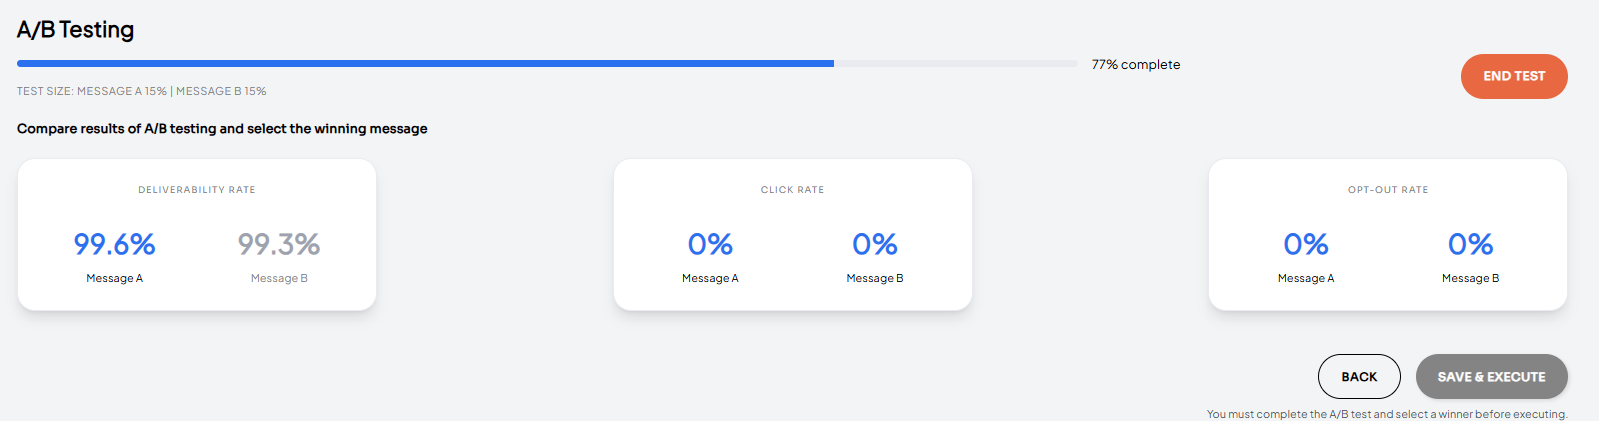
Once the A/B test is started, you will see the progress bar as well as statistics for each variation. The progress bar will fill out once the system starts sending the messages.
Please note: this will behave as any regular campaign and will need to go through scheduling and sending. Depending on the size of the test group, this may take several minutes.
The deliverability data will start populating once we start receiving it from our providers.
Please note: this data is refreshed every minute and may take several minutes to update.
If you want to end a/b test earlier, you can click the ‘End test’ button. This will stop any remaining messages from being sent out.
Promoting the winning campaign
Open the A/B test you want to promote.
Navigate to the build page.
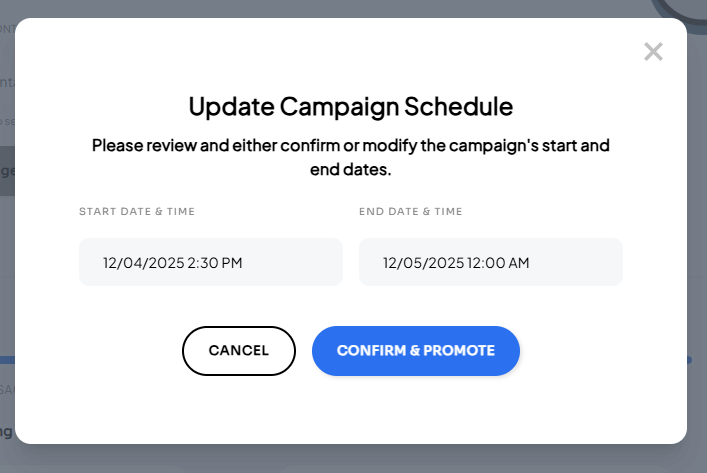
Click the ‘End Test’ button.
Select the winning message and click the ‘Save & Execute’ button.
Review and confirm start and end date/time for the winning campaign.
Once confirmed, the system will create the campaign and will schedule messages according to the start date/time.
Release Notes - Jan 8, 2026
Release Notes 01-09-26
The following changes will be released on January 8, 2026 at 9:30 PM.
PROSPECTING
Features
Updated logic for fully scheduled campaigns to show up in the outbox earlier. This allows users to click out and confirm messages prior to the campaign start time.
Updated file size limit to be 850KB or under for better performance. The system will now show a size validation error if the file is over that limit.
Updated logic on ‘link’ custom data point to ensure the phone preview displays the domain that will be sent out:
Initially, the ‘link’ custom data point is disabled.
Once click tracking is enabled, you can add it to the message.
Until a domain is selected, phone preview will show this placeholder text:
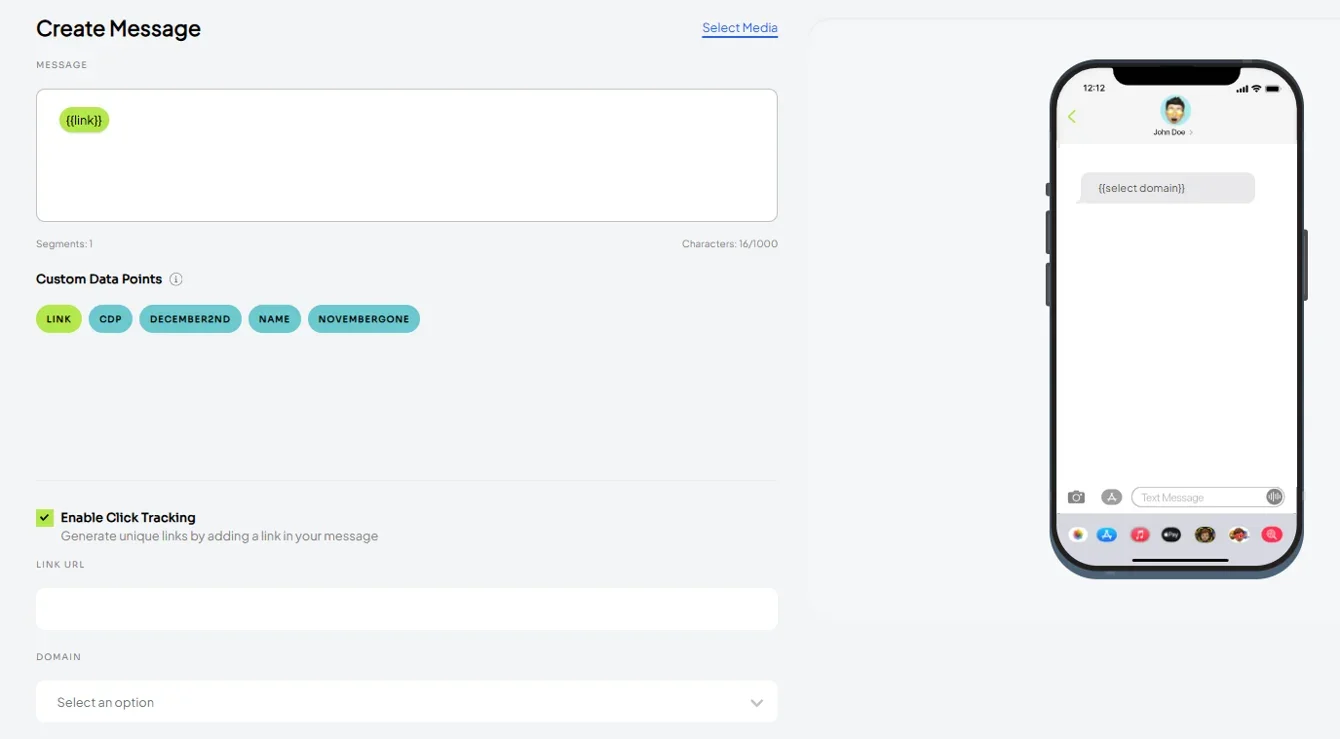
Once you select the domain, the phone preview will update accordingly.
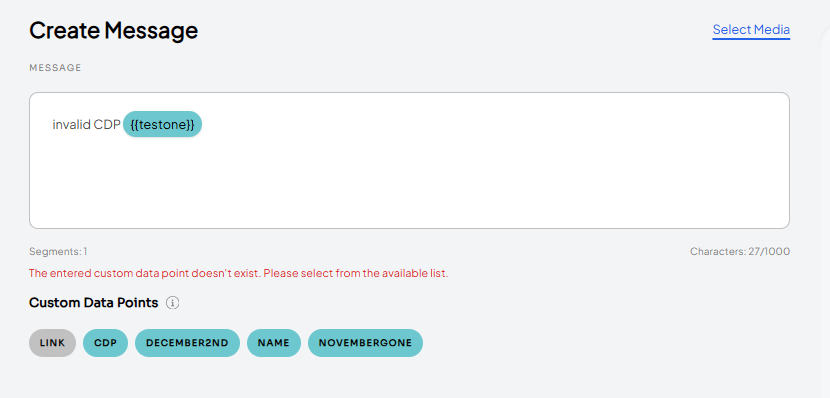
Added a warning message when a user manually enters a custom data point that is not on the list of the available ones.
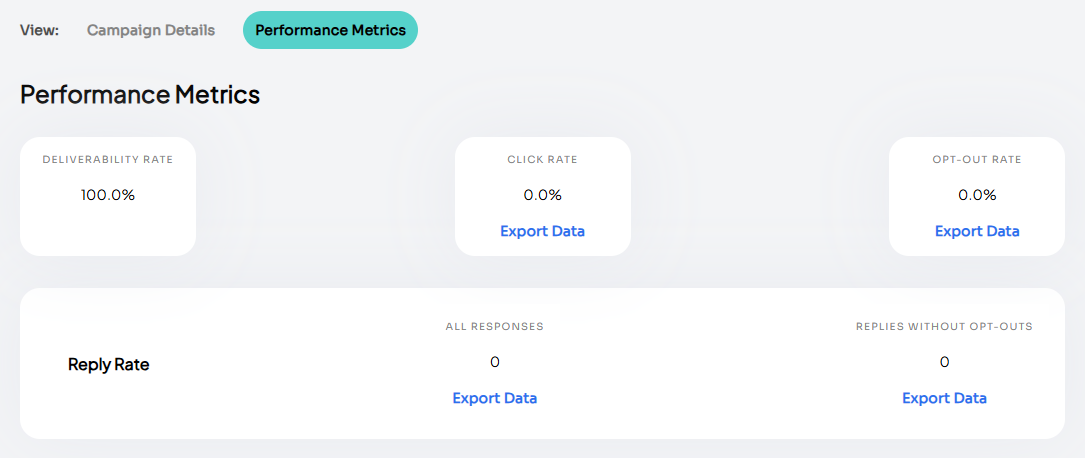
Added the ability to export click rate and opt-outs rate on the campaign’s performance metrics.
Release Notes - Dec 9, 2025
Release Notes 01-09-26
Fixes
Updated logic on campaign creation to only show custom data points available for the selected contact lists.
Features
A/B Testing
Added the ability to set up an A/B test campaign. Please review the A/B test quick guide for step by step instructions.
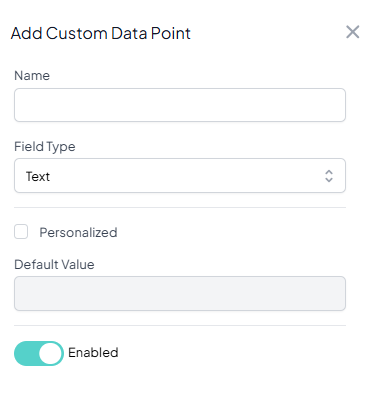
Custom Data Points
Users (Staff Manager role only) now have access to the ‘Data Points’ page under the ‘Settings’ tab. This page will display all of your custom data points, either created from contact list upload or via the ‘Data Points’ page record creation.
PLEASE NOTE: Following this release, you will need to re-upload your existing contact lists to ensure all of your current custom data points appear correctly during campaign creation. You will not need to update any personalization settings — those already exist and will remain intact.
Create New Custom Data Points via Contact List Upload (Option 1) :
Include any new custom data points on the contact list upload.
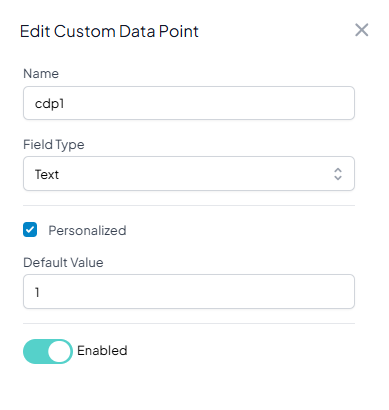
Once uploaded, navigate to the ‘Data Points’ page and open the details screen on the new custom data point.
Check the ‘Personalized’ checkbox and include the default value.
PLEASE NOTE: You must complete the steps above for your custom data points to (1) appear as options during campaign creation and (2) have their default values automatically populate any in place of any blank fields in your contact lists.
Create new custom data points on the ‘Data Points’ page (Option 2):
Navigate to the ‘Data Points’ page.
Click the ‘Add Data Point’ button
Fill out all of the fields and save.
PLEASE NOTE: You must complete the steps above for your custom data points to (1) appear as options during campaign creation and (2) have their default values automatically populate any in place of any blank fields in your contact lists.
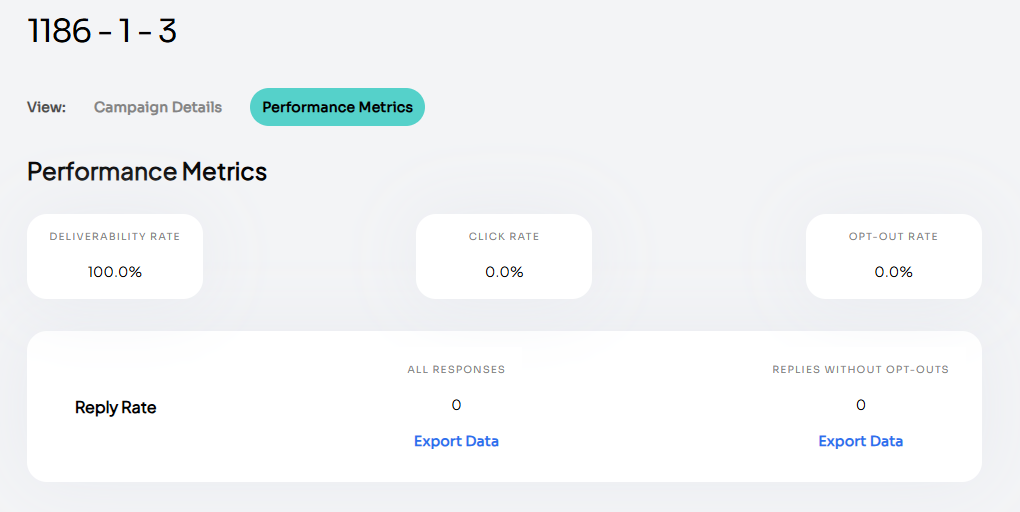
Export Replies
Added the ability to export ‘Reply Rate’ on a campaign.
Navigate to the campaign details page.
Click on the ‘Performance Metrics’ tab.
From here, you can export all replies or replies without opt-outs. The file will be emailed to you.
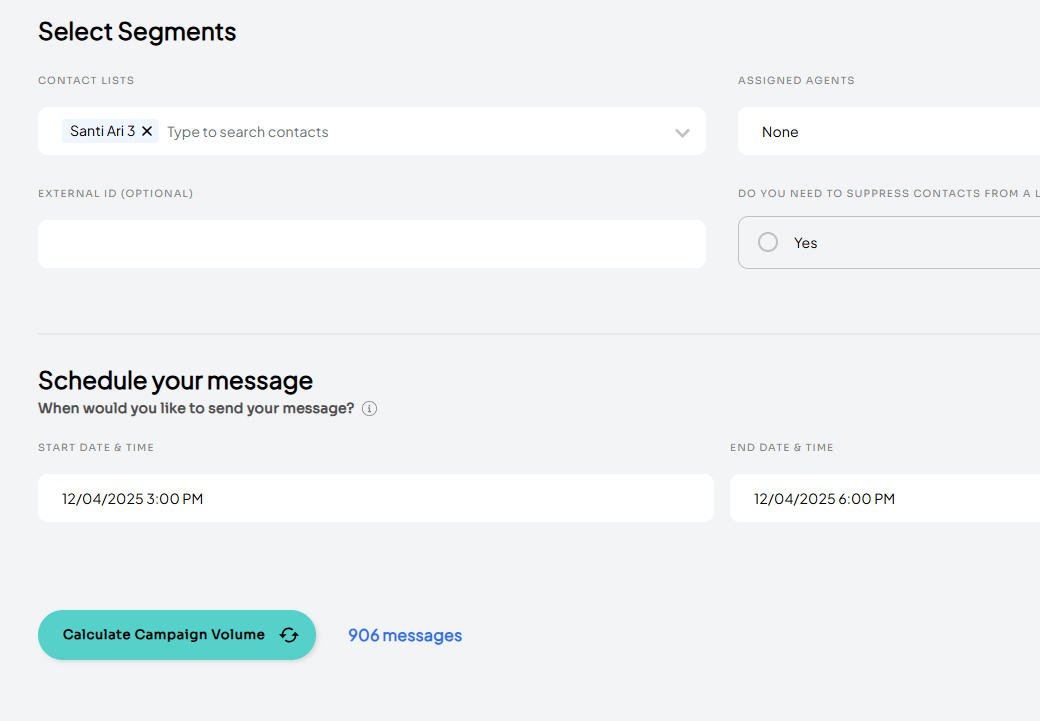
Calculate Campaign Volume
Added the ability to calculate volume on a campaign based on selected contact lists and any suppressions.
Two-Page Campaign Create
Implemented a two-page campaign flow.
Message build out and preview now happens on page 2
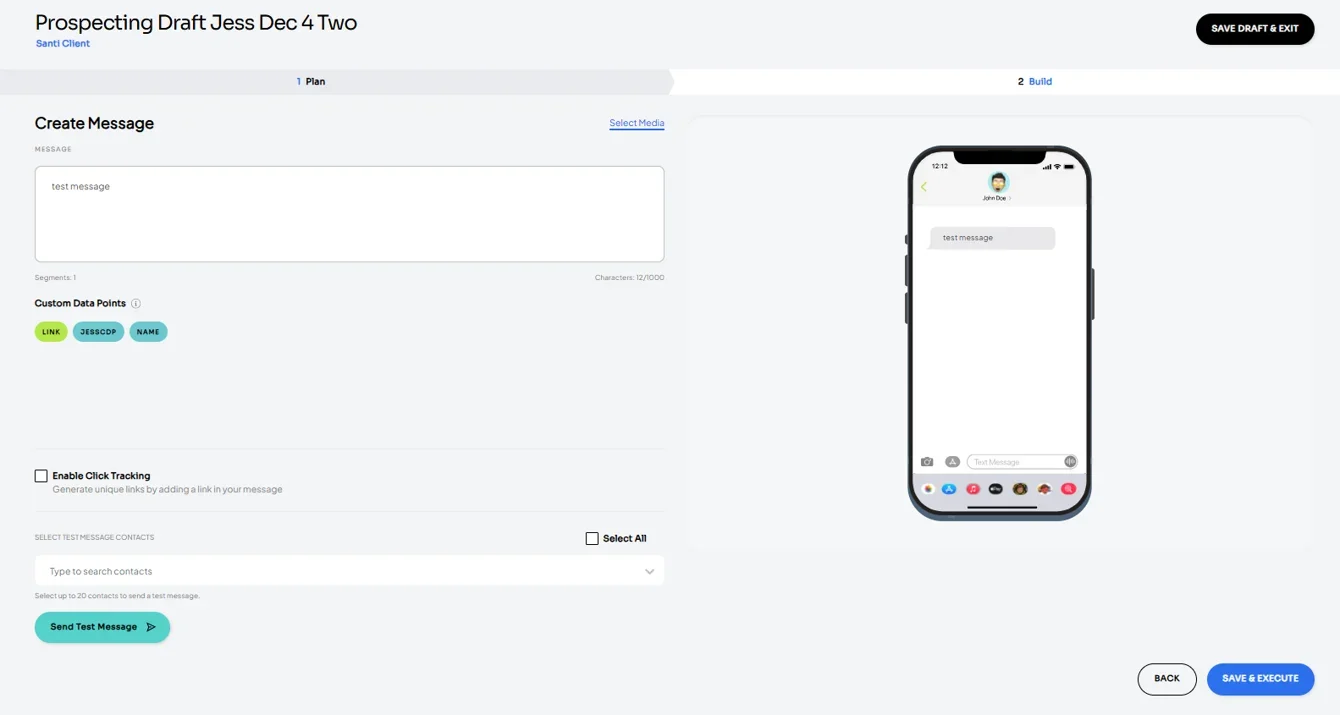
Please note: you no longer need to select ‘Message Type’ on the plan page. During message creation, the system defaults to an SMS message. Simply upload a file to convert to an MMS message.